In previous posts, we showed you how to build a two-party video chat and how to build a multi-party video conference, both using the Amazon Chime SDK. Capitalizing on the considerable flexibility that the Amazon Chime SDK offers for customizing the UI, we’re going to take yet another step in our application and add a new feature: active speaker detection to create a pinned video feed. This ability to implement any sort of visual design on top of a simple back end is just another reason our team at WebRTC.ventures is loving building with the Amazon Chime SDK!
Imagine a call with 30 people and one of them starts talking, you’d need to basically search for this person in a crowd. This feature allows us to identify the active speaker and manipulate the user interface to favor that stream over the rest. The main benefits are an improved user experience and the possibility to optimize bandwidth to improve call quality.
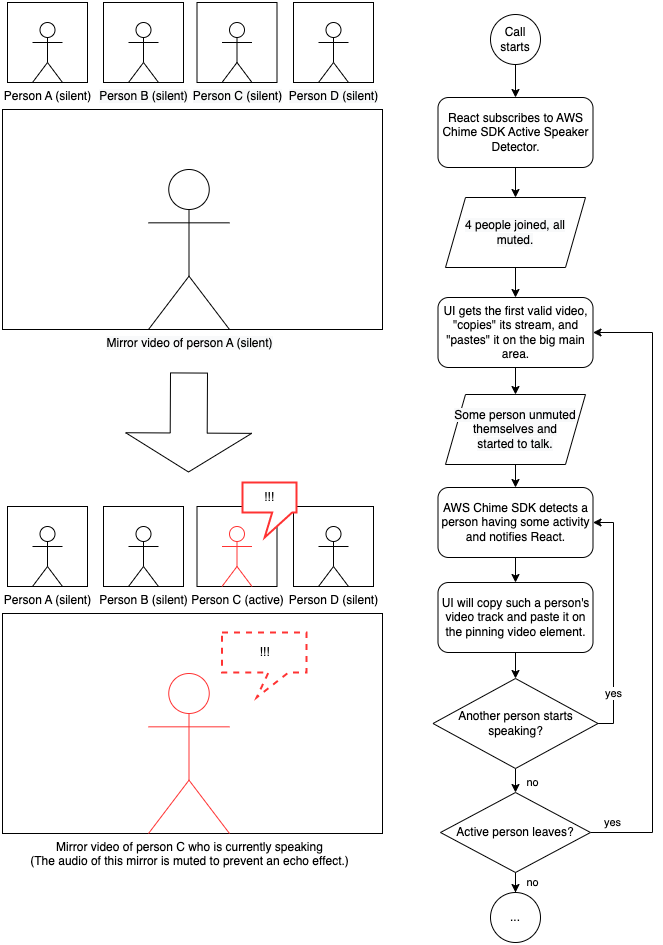
Below, we can see that the peer talking at the moment has more focus on the screen than the rest of the peers who are quietly watching.

As when we moved from the two-party chat to the multi-party conference, we’ll be only changing the front end code. We can use the same backend we built previously. The full code of this demo is available on GitHub:
- https://github.com/WebRTCventures/simple-chime-frontend
- https://github.com/WebRTCventures/simple-chime-backend
Planning our work
Here’s a drawing of what we’re going to implement. Assume that you’re the Person A and the first to join the meeting:
Getting to work
First, we’ll write the code responsible for “copying” the stream from an element and “pasting” on a given element responsible for focus (that could be bigger, for example).
function copyStreamToPinnedVideo(
  originatingVideoElement,
  pinnedVideoElement = document.getElementById("video-pinned")
) {
  if (!originatingVideoElement || !originatingVideoElement.srcObject) {
    console.error(
      "Invalid originating video element/stream",
      originatingVideoElement
    );
    return;
  }

  if (!pinnedVideoElement) {
    console.error("Invalid pinned video element", pinnedVideoElement);
    return;
  }

  if (pinnedVideoElement.srcObject === originatingVideoElement.srcObject) {
    return;
  }

  pinnedVideoElement.muted = true;
  pinnedVideoElement.volume = 0;
  pinnedVideoElement.setAttributeNode(document.createAttribute("autoplay"));
  pinnedVideoElement.setAttributeNode(document.createAttribute("playsinline"));
  pinnedVideoElement.srcObject = originatingVideoElement.srcObject;
}
Taking a good read on the code, it begins with a lot of conditional guards for unavailable resources. This defensive programming is just in case the SDK tries to do something before the Document Object Model (DOM) is ready. As we discussed in a previous article, the React’s reconciliation algorithm can be the source of very annoying bugs if we try to mess with it in aggressive ways.
The rest of the copyStreamToPinnedVideo is pretty straightforward: we make sure the element is not emitting sounds, will be playing as soon as possible and will receive the same source object (the same video stream) as some originating element. Such an originating element could be your local video, someone else’s video, or whoever is speaking at the moment.
It is worth mentioning that we’re muting this pinned element forever because there’s already an audio of the person speaking from its originating tag. We don’t want duplicated audio or we would get an echo.
This function is agnostic. Where’s the pinned element and how can we know who’s speaking at the moment? These questions will be answered later.
For now, let’s identify each remote video element and the user’s own local video element for a more “global usage” like our helper above. We’ll do this by adding an ID to them. The library already provides one for each attendee, so we’re going to use it.
Starting by our VideoLocalOutput component, let’s add one single extra line to our observer callback:
    // …
    const observer = {
      videoTileDidUpdate: (tileState) => {
        if (!tileState.boundAttendeeId || !tileState.localTile) {
          return;
        }
        meetingSession.audioVideo.bindVideoElement(
          tileState.tileId,
          videoElement
        );

        // new line here!
        videoElement.id = `video-${tileState.boundAttendeeId}`;
      },
    };
    // …
Now for our RemoteVideosSection, it’s a very similar new line as well:
  // …
    const observer = {
      videoTileDidUpdate: (tileState) => {
        // …
        meetingSession.audioVideo.bindVideoElement(
          tileState.tileId,
          slot.video
        );

        // new line here!
        slot.video.id = `video-${tileState.boundAttendeeId}`;
      },
      videoTileWasRemoved: (tileId) => {
      // …
There, only three new lines for the existing components.
Nothing should be breaking so far, even if nothing new is really working.
Let’s create a new component for the pinned element:
function PinnedVideoSection() {
  const videoRef = useRef(null);

  return (
    <Video
      ref={videoRef}
      id="video-pinned"
      aria-label="Pinned video"
    />
  );
}
And use it in the App component somewhere along with the existing ones:
// …
<VideoLocalOutput meetingSession={meetingSession} />
<RemoteVideosSection meetingSession={meetingSession} />
<PinnedVideoSection />
// …
You can take some time to style this element. You can add a new border, make it bigger and centered, or whatever you’d like.
Now, let’s change our App effect hook to include some Amazon Chime SDK magic!
 // …
    setupInput({ audioId: "default", videoId: "default" }).then(() => {
      // …
      meetingSession.audioVideo.start();

      // new callback being added!
      const activeSpeakerCallback = (attendeeIds) => {
        if (!attendeeIds || !attendeeIds.length) {
          return;
        }

        const mostActiveAttendeeId = attendeeIds[0];
        const mostActiveAttendeeElement = document.getElementById(
          `video-${mostActiveAttendeeId}`
        );
        copyStreamToPinnedVideo(mostActiveAttendeeElement);
      };

      meetingSession.audioVideo.subscribeToActiveSpeakerDetector(
        new DefaultActiveSpeakerPolicy(),
        activeSpeakerCallback
      );
      // end of new callback being added!
    });
    // …
I left the diff chunk within comments so you could easily spot the difference. We’re creating this activeSpeakerCallback function and using it for subscribeToActiveSpeakerDetector method. What this function does is let you know what’s happening with people talking at the moment. This has many use cases that you can explore later.
Our focus for activeSpeakerCallback right now is to pick the most recent attendee speaking on top of this list, get its element based on its ID and finally, copy the element’s stream to the pinned video using our helper function.
We’re not done yet. On PinnedVideoSection, add this effect hook:
  // …
  useEffect(() => {
    const workerId = setInterval(() => {
      if (videoRef.current.srcObject && videoRef.current.srcObject.active) {
        return;
      }

      const foundActiveStreamingElement = Array.from(
        document.getElementsByClassName("streaming-video")
      ).find((el) => el.srcObject && el.srcObject.active);

      copyStreamToPinnedVideo(foundActiveStreamingElement, videoRef.current);
    }, 3000);

    return () => clearInterval(workerId);
  }, []);
  // …
Now the pinned component itself is making sure that there’s always a fallback for its own stream. Imagine that a person who had been speaking left the meeting and nobody else was speaking. The pinned element would be a blank video or a frozen frame. We don’t want this! So this effect is periodically checking if there’s no valid stream in the pinned element and copying a new one (any new active stream of anyone in the call) to itself.
Now we’re done!
You can check the full repository to see what I did. I also took some time adding a cool styling inspired by common video conferencing apps.
Final considerations
One more time, we noticed that Amazon Chime SDK gives you a lot of freedom for UI aspects and only actually cares about the WebRTC logic like the activity detection itself. From the speaker detection to its consequences to the user interface – we controlled it all!
In my example, I made the pinned element bigger to make it stand out. Alternatively, you could make the all speakers have a green border indicating if multiple people is speaking, and many other options. You can also let the user decide if they want to have a pinned version of the current person speaking or if they want to decide manually who to pin. All these use cases are very common on most of the video conferencing apps. Having full control over the UI, the sky’s the limit.
Are you looking for expert design and development help with building your live video application? Our team of experts at WebRTC.ventures have years of experience with Amazon and close relationships with the Amazon Chime SDK team. We would be happy to help you build, deploy, and scale your live video application. We can even offer managed services and hosting around your Amazon Chime SDK application so that you can offload everything about it to our team. Contact us today for more information!
Other posts in this series: