The Amazon Chime SDK is an Amazon service that lets you create multimedia calls using JavaScript-based web technologies. It’s a powerful service based on the WebRTC standard and backed by the global infrastructure and scalability of Amazon Web Services. Amazon also offers an Amazon Chime meeting tool based on the same technology, but with the Amazon Chime SDK you can build your own completely custom application right on top of Amazon’s infrastructure.
The Amazon Chime SDK offers a nice balance between an “easy to use” WebRTC CPaaS and the “building block” approach of many open source media server solutions. The Amazon Chime SDK gives you the power and capabilities of many lower level solutions, while still offering the abstraction and built-in media server infrastructure of the simpler CPaaS solutions. This balance is very powerful for a wide range of use cases from live video startups with plans to scale dramatically, to larger enterprises like call centers that want to ensure a globally scalable and reliable infrastructure.
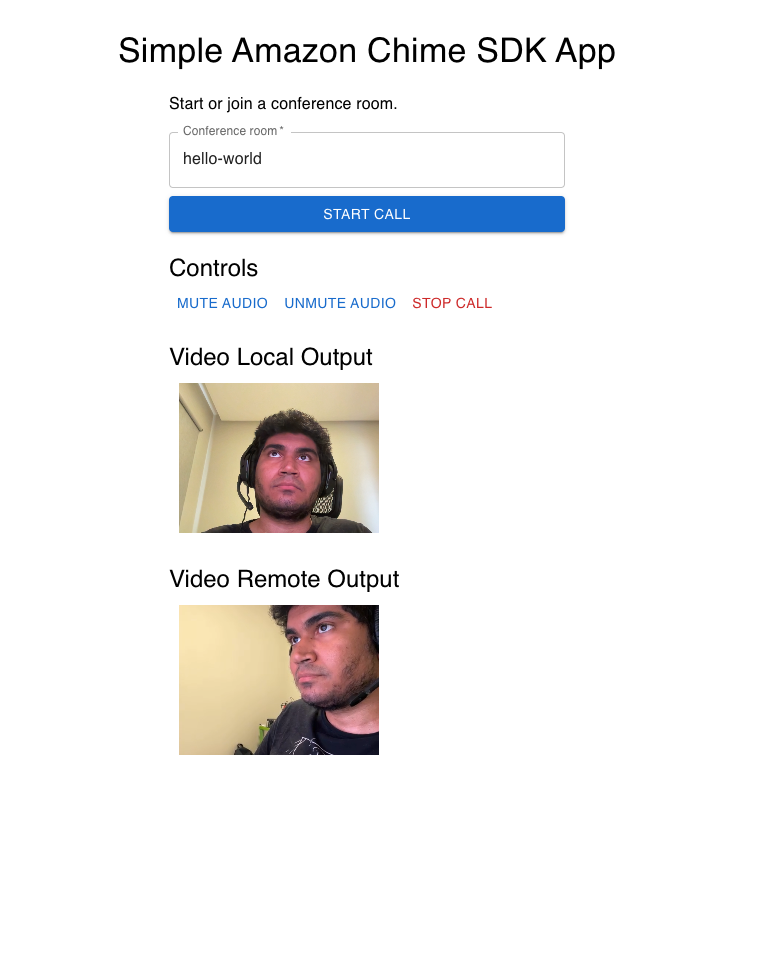
In this blog post, we’ll use the Amazon Chime SDK to make a 1-1 call between two people by building a video chat using WebRTC with React and Node Fastify. We’ll have a form to start the call and another button to stop it. Nothing fancy, but it will be a good start for learning about the Amazon Chime SDK and building your application.
Even with such simplicity, it takes some manual work to get to this point. That’s because the Amazon Chime SDK gives you a considerable amount of flexibility. There are other CPaaS solutions which offer simpler APIs, but they don’t have the same capabilities and it’s considerably harder to add your own customizations. We all know that flexibility with simplicity is a great and rare combination, hence the side effect of more manual work usually pays off.
The full code of this demo is available on GitHub at:
- https://github.com/WebRTCventures/simple-chime-frontend
- https://github.com/WebRTCventures/simple-chime-backend
Simplified architecture
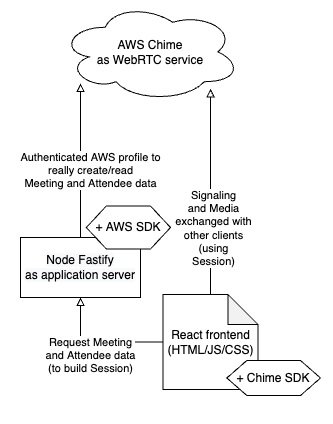
Let’s take a look at the big picture first.
Our core WebRTC features are powered by the Amazon Chime SDK service, responsible for signaling and media. That means that this service will coordinate how clients can reach each other and how data flows both ways. Very similar to a telephony company’s infrastructure, sending ring signals for someone to answer (or reject) and making two people exchange audio data. The Amazon Chime SDK abstracts all of the WebRTC backend, but is very flexible on frontend.
We’ll choose Node Fastify as the framework for the application server. It will also integrate with the Amazon Chime SDK service. Being an application server means that it controls business logic and can decide if a user can join a session or not, for whatever reason. For example, maybe you want to have a room locked for two people, only allow logged users to join, or only allow paying users to create new rooms, and so on. We chose Fastify for its simplicity and good maintainers support.
And for the client side, we’ll use React. Again, this choice is aiming for simplicity. But it also leverages a declarative interface organized by components, with huge popularity, and thus good community support. As advanced programmers will notice, however, its declarative paradigm might come into friction with the imperative nature of WebRTC and have many unintended side effects.
Here’s a diagram:
We weren’t concerned much with the production deployment perspective here, nor alternatives. These topics will be addressed in a future post.
Application backend
Since we’re only focusing on making a call possible, we won’t need any business logic in this demo, and so our application server will just be a middleware for Amazon Chime SDK integration. That’s still important because handling the data for creating and joining meetings uses your AWS credentials (and billing). For security reasons, you do not want that exposed in the frontend code.
Requirements
You must have Node 16 installed and functioning for our demo code to work.
We’ll use the regular AWS Node SDK, which will take care of authentication too. As an additional requirement, you must have an IAM User granted with Amazon Chime permissions as policy, and have that configured as AWS Named Profile using your AWS Command Line Interface (AWS CLI).
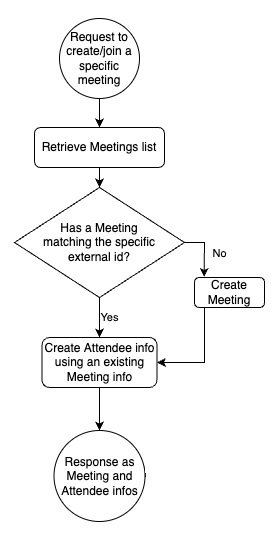
Flowchart
The flow to join a meeting is very straightforward:
Starting the server
In a parent folder, run:
npx fastify-cli generate my-chime-backendNow inside the created directory, run:
npm install
npm start
Your server should now be running.
Keep in mind that this assumes that you already have your AWS Named Profile configured by the AWS CLI with authorization to use the Amazon Chime SDK services as explained before.
After confirming the start script runs, cancel it. Change your package.json to include a few details, in order to set up a development server on port 3001 (the frontend will later be on 3000). It should look like this:
{
  // …
  "scripts": {
    "start": "fastify start -w -l info -P app.js --port 3001",
    // …
  },
}
Next install some dependencies:
npm install -s aws-sdkNow you should be able to run the npm start script again.
Integration with the Amazon Chime SDK
In the routes folder, create a new file called chime-integration.js with this content (explanations of each code chunk is below as code comment):
'use strict';
const AWS = require('aws-sdk');
const { v4: uuid } = require('uuid');

module.exports = async function (fastify, opts) {
  fastify.get(
    '/chime-integration/meeting-session',
    async function (request, reply) {

      // Initialize Chime instance
      const chime = new AWS.Chime({ region: 'us-east-1' });
      chime.endpoint = new AWS.Endpoint('https://service.chime.aws.amazon.com');

      // Retrieve Meetings list
      const meetingsResult = await chime.listMeetings().promise();

      // Can find a Meeting with a specific “external id” (aka, “room”)?
      const foundMeeting = Array.from(meetingsResult.Meetings).find(
        (it) => it.ExternalMeetingId === request.query.room
      );

      // If not, create a new Meeting info.
      const createdMeetingResponse =
        !foundMeeting &&
        (await chime
          .createMeeting({
            ClientRequestToken: uuid(),
            MediaRegion: 'us-west-2',
            ExternalMeetingId: request.query.room,
          })
          .promise());

      // … or use the found meeting data.
      const meetingResponse = foundMeeting
        ? { Meeting: foundMeeting }
        : createdMeetingResponse;

      // Create Attendee info using the existing Meeting info.
      const attendeeResponse = await chime
        .createAttendee({
          MeetingId: meetingResponse.Meeting.MeetingId,
          ExternalUserId: uuid(), // Link the attendee to an identity managed by your application.
        })
        .promise();

      // Respond with these infos so the frontend can safely use it
      return {
        attendeeResponse,
        meetingResponse,
      };
    }
  );
};
As you will notice, the backend part is very straightforward, the Amazon Chime SDK is handling all the hard parts for us on the server side.
Implementing client side
The frontend will retrieve authenticated data from the backend and use it with the client SDK to make the video calls work and bind media events to the user interface.
Requirements
Just like the backend, it’s important to have Node 16 installed and working properly.
Flowchart
Everything happens asynchronously, so while we type code snippets things might get confusing. But here’s the complete flow, and you can use this to keep your eyes on what we’re trying to achieve if you feel lost in the middle of the coding that follows:

Starting the frontend
In a parent folder (not the same as the backend, but they can be sibling directories), run:
npx create-react-app my-chime-frontendNow inside the created directory, execute the start command:
npm startYour frontend should be running and it probably opened a browser window from the console.
Now that you’ve confirmed that works, cancel the server, because a few changes are needed in the package.json file. We need HTTPS instead of HTTP and have some requests being redirected to the backend. It should look like this:
{
  // …
  "scripts": {
    "start": "cross-env HTTPS=true GENERATE_SOURCEMAP=false react-scripts start",
    // …
  },
  "proxy": "http://localhost:3001",
}
Then install some important dependencies for Amazon Chime SDK integration:
npm install cross-env amazon-chime-sdk-js axiosWe also need to install some not so important dependencies, but they’ll help the application to be more pleasant to the eyes with the Material UI library:
npm install @mui/material @emotion/react @emotion/styledYou can run the npm start script again to double check if everything is still working well. You’ll notice that it’s using a self signed HTTPS now, which is needed for most WebRTC features in development mode.
Getting to work
Before getting started, on index.js, disable strict mode which can duplicate renders and side effects and cause issues with our Amazon Chime SDK usage. Its code should be similar to this:
root.render(<App />);Now we will continue to follow that flow chart from earlier. First, the user provides an external meeting id (a room name). Let’s create a component with a header and a form just for that. Soon we’ll implement the rest, but for now the code will just create the session and other some components as dumb functions.
import { Box, Button, Container, TextField, Typography } from "@mui/material";
import { forwardRef, useEffect, useState, useRef } from "react";

export default function App() {
  const [meetingSession, setMeetingSession] = useState(null);
  const [hasStartedMediaInputs, setStartedMediaInputs] = useState(false);

  const handleJoin = (joining) => {
    createMeetingSession(joining).then((it) => setMeetingSession(it));
  };

  useEffect(() => {
    if (!meetingSession) {
      return;
    }

    console.warn("Meeting session instance...", meetingSession);
  }, [meetingSession]);

  return (
    <Box
      width="100%"
      paddingBottom="50px"
      paddingTop="50px"
      overflow="auto"
      display="flex"
      flexDirection="column"
      justifyContent="center"
    >
      <MainHeader />
      <MainJoiningMeeting onJoin={handleJoin} />
      {meetingSession && hasStartedMediaInputs && (
        <>
          <Controls meetingSession={meetingSession} />
          <VideoLocalOutput meetingSession={meetingSession} />
          <VideoRemoteOutput meetingSession={meetingSession} />
        </>
      )}
    </Box>
  );
}

async function createMeetingSession({ room }) {
  console.warn("TODO: create meeting", room);
  return null;
}

function MainHeader() {
  return (
    <Box component="header" textAlign="center">
      <Typography component="h1" variant="h4">
        Simple Amazon Chime SDK App
      </Typography>
    </Box>
  );
}

function MainJoiningMeeting({ onJoin }) {
  const handleSubmit = (event) => {
    event.preventDefault();

    const joining = {
      room: event.target.room.value,
    };
    onJoin(joining);
  };

  return (
    <Container component="main" maxWidth="xs">
      <Typography component="p" variant="body1" marginTop="10px">
        Start or join a conference room.
      </Typography>
      <Box component="form" onSubmit={handleSubmit}>
        <TextField
          name="room"
          label="Conference room"
          placeholder="Enter any alphanumeric id..."
          maxLength="64"
          minLength="2"
          margin="normal"
          fullWidth
          required
        />
        <Button type="submit" variant="contained" fullWidth>
          Start call
        </Button>
      </Box>
    </Container>
  );
}

function Controls({ meetingSession }) {
  return <p>Controls</p>;
}

function VideoLocalOutput({ meetingSession }) {
  return <p>VideoLocalOutput</p>;
}

function VideoRemoteOutput({ meetingSession }) {
  return <p>VideoRemoteOutput</p>;
}

const PeerBox = ({ enabled, ...props }) => null;

const Video = forwardRef((props, ref) => null);
If you fill the form and your console is printing that room name correctly, then you’re good to continue to the next step.
The backend will return the Meeting info and Attendee info, so we can implement that createMeetingSession function now, instead of the previous “TODO” console warning:
import {
  ConsoleLogger,
  DefaultDeviceController,
  DefaultMeetingSession,
  LogLevel,
  MeetingSessionConfiguration,
} from "amazon-chime-sdk-js";
import axios from "axios";

// …

const logger = new ConsoleLogger("Logger", LogLevel.INFO);
const deviceController = new DefaultDeviceController(logger);

async function createMeetingSession({ room }) {
  const params = new URLSearchParams([["room", room]]);
  const response = await axios.get("/chime-integration/meeting-session", {
    params,
  });
  const { meetingResponse, attendeeResponse } = response.data;

  const configuration = new MeetingSessionConfiguration(
    meetingResponse,
    attendeeResponse
  );

  const meetingSession = new DefaultMeetingSession(
    configuration,
    logger,
    deviceController
  );

  return meetingSession;
}
That’s it. After submitting the form, wait a little bit (don’t click twice), you should see a console displaying your meetingSession now, because of that effect hook declared in the parent component. It was built using the meeting and attendee information from the backend.
We already have more or less prepared the video tags for local and remote streams. They’re supposed to be those dumb components with p tags and null returns. Let’s fill them with some code, for setting up video tags (but they won’t be visible until we bind the media tracks later on in the code):
function VideoLocalOutput({ meetingSession }) {
  const videoRef = useRef(null);

  return (
    <Box component="section">
      <h3>Video Local Output</h3>
      <PeerBox enabled>
        <Video ref={videoRef} />
      </PeerBox>
    </Box>
  );
}

function VideoRemoteOutput({ meetingSession }) {
  const videoRef = useRef(null);

  return (
    <Box component="section">
      <h3>Video Remote Output</h3>
      <PeerBox enabled>
        <Video ref={videoRef} />
      </PeerBox>
    </Box>
  );
}

const PeerBox = ({ enabled, ...props }) => (
  <Box
    display={enabled ? 'inline-block' : 'none'}
    width="200px"
    height="150px"
    backgroundColor="black"
    margin="10px"
    {...props}
  />
);

const Video = forwardRef((props, ref) => (
  <video
    ref={ref}
    width="100%"
    height="100%"
    style={{ objectFit: 'cover' }}
    {...props}
  />
));
That local video will be your own camera, while the remote video will be the other person in the call (which for development purposes may be yourself in a different browser). While you can’t see the other participant as a user for now, nothing should break.
Now, to see actual stuff, let’s start to make the video visible! Meeting Session is used to set up observers for audio/video local tracks. In the App effect hook that is currently just printing the instance, let’s rewrite it to be like this:
useEffect(() => {
    if (!meetingSession) {
      return;
    }

    const setupInput = async ({ audioId, videoId } = {}) => {
      if (!audioId || !videoId) {
        throw new Error("No video nor audio input detected.");
      }

      if (audioId) {
        const audioInputDevices =
          await meetingSession.audioVideo.listAudioInputDevices();
        if (audioInputDevices.length) {
          await meetingSession.audioVideo.startAudioInput(audioId);
        }
      }

      if (videoId) {
        const videoInputDevices =
          await meetingSession.audioVideo.listVideoInputDevices();
        if (videoInputDevices.length) {
          const defaultVideoId = videoInputDevices[0].deviceId;
          console.warn("starting video input");
          await meetingSession.audioVideo.startVideoInput(
            videoId === "default" ? defaultVideoId : videoId
          );
          setStartedMediaInputs(true);
        }
      }
    };

    setupInput({ audioId: "default", videoId: "default" }).then(() => {
      const observer = {
        audioInputMuteStateChanged: (device, muted) => {
          console.warn(
            "Device",
            device,
            muted ? "is muted in hardware" : "is not muted"
          );
        },
      };
      meetingSession.audioVideo.addDeviceChangeObserver(observer);

      meetingSession.audioVideo.start();
    });
  }, [meetingSession]);
We configured selected media inputs and set observers to be aware of their situation. So the Amazon Chime SDK is doing its job by listening to the user’s microphone and camera, basically. Now let’s put an effect hook on VideoLocalOutput to bind these observed devices to their tags:
 useEffect(() => {
    if (!videoRef.current) {
      return;
    }

    const videoElement = videoRef.current;

    const observer = {
      videoTileDidUpdate: (tileState) => {
        if (!tileState.boundAttendeeId || !tileState.localTile) {
          return;
        }
        meetingSession.audioVideo.bindVideoElement(
          tileState.tileId,
          videoElement
        );
      },
    };
    meetingSession.audioVideo.addObserver(observer);

    meetingSession.audioVideo.startLocalVideoTile();
  }, [meetingSession]);
Refresh your page and try to submit that form again, and you should be able to see your own image now. What’s happening so far is that you created or joined the session, turned on your media devices and bound their tracks to a video tag.
Now, let’s do a similar task for the other participant’s remote stream. When a new remote stream arrives (ie, a new person joined), bind it to some available document as well:
useEffect(() => {
    if (!videoRef.current) {
      return;
    }

    const videoElement = videoRef.current;

    const observer = {
      videoTileDidUpdate: (tileState) => {
        if (
          !tileState.boundAttendeeId ||
          tileState.localTile ||
          tileState.isContent
        ) {
          return;
        }
        meetingSession.audioVideo.bindVideoElement(
          tileState.tileId,
          videoElement
        );
      },
    };
    meetingSession.audioVideo.addObserver(observer);
  }, [meetingSession]);
It’s pretty similar, except for the conditions that exclude your local feed and the method named bindVideoElement without the “local” part. Now open your incognito browser window to simulate a different peer and join the same room as the second person, you’ll see the video call working for these two participants.
When the user decides, stop inputs and leave the session. We can add that into our Controls component:
function Controls({ meetingSession }) {
  return (
    <Box component="section">
      <h3>Controls</h3>
      <Button
        type="button"
        color="error"
        onClick={() => meetingSession.audioVideo.stop()}
      >
        Stop call
      </Button>
    </Box>
  );
}
Our Simple Amazon Chime SDK Video Chat is Complete!
Now we have a call fully working, but just with the basics. For more controls and features, take a look at the Amazon Chime SDK page on GitHub. They have plenty of use cases, a few of them pretty advanced stuff. Here’s a demonstration of this same application evolving to support multiple peers and include even a focus on the participant currently speaking:
Final considerations
As we can see, building an Amazon Chime SDK application does indeed require a lot of manual work. But everything is still fairly simple. It is therefore highly recommended for when you want to build an application with the reliability that only Amazon provides. And, you want the UI to be heavily customized with powerful features.
Some other CPaaS will offer easier to use SDKs. With their pre-built UI we would have been able to build this app faster and with fewer lines of code. However, if you want a higher degree of flexibility, the Amazon Chime SDK offers that capability.
Using the Amazon Chime SDK also offers some benefits over open source media servers. In that case, the quality of documentation and support for the open source solutions will vary. Equally important, they also require more of a self-hosted WebRTC backend, which implies more media infrastructure work.
On top of what the Amazon Chime SDK has to offer for the media server portions of our application, we also have the entire AWS infrastructure for the rest of our cloud hosting needs. Our backend, for example, could simply be a set of Lambda functions at very low cost and our frontend could be hosted with S3 Buckets.
Hopefully, you’re already starting to see the power of the Amazon Chime SDK solution – and we haven’t even talked yet of other more advanced features like multiple remote users, noise reduction, text chat, and integration of video/audio calls with traditional telephony. We will get into those capabilities in future blog posts!
Are you looking for expert design and development help with building your live video application? Our team of experts at WebRTC.ventures have years of experience with Amazon and close relationships with the Amazon Chime SDK team. We would be happy to help you build, deploy, and scale your live video application. We can even offer managed services and hosting around your Amazon Chime SDK application so that you can offload everything about it to our team. Contact us today for more information!
Other posts in this series: