In a previous post, we showed you how to build a simple two party video chat using the Amazon Chime SDK. Refer to that post for more on why we highly recommended the Amazon Chime SDK for anyone looking for a scalable and flexible live video solution built on top of a globally distributed backend. Today, we will move forward on that code to support as many people/devices as you want.
Remember, the full code of this demo is available on GitHub at:
- https://github.com/WebRTCventures/simple-chime-frontend
- https://github.com/WebRTCventures/simple-chime-backend
The Amazon Chime SDK is a good combination of a simple backend that gives you a lot of flexibility on the frontend implementation. Because of that, we won’t need to make any changes to the backend code from our initial two-party call. Hence, this article will focus on how to change the frontend code to allow for multiple users. In the end, we hope you will see how this allows us to implement any sort of visual design on top of the Amazon Chime SDK, which is different than other CPaaS’s which require you to work within their layout options for a video chat.
Let’s draw a picture first
Hold your breath, we’ll see each step explained and exemplified more ahead:
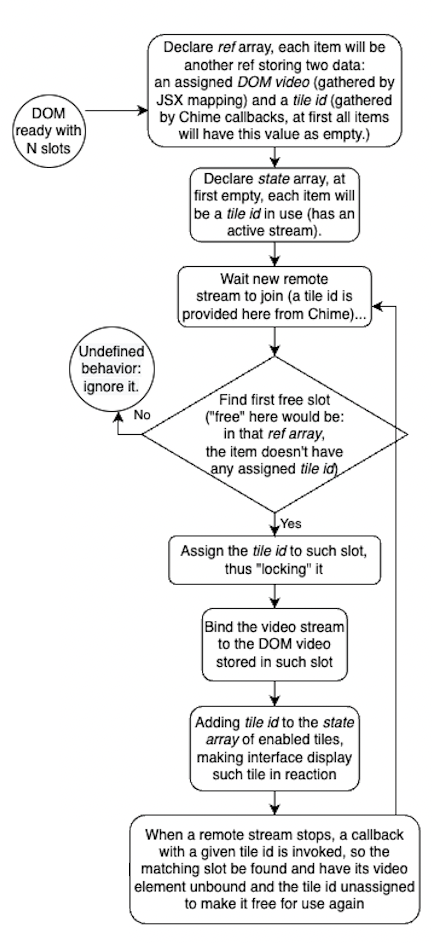
This means we’ll need pre-existing DOM elements controlled by React which must always be ready to be used by the Amazon Chime SDK.
In other words, when a new user joins, Amazon Chime SDK will ask: “Hey, React, quickly, give me a video tag I can use for this person”. React must have that available to answer, locking that slot for a given user.
React control is important to prevent having two users using the same video tag, and at the same time giving the developer full control of how that tag will look like. Maybe a grid view? Having users floating around the page? Hiding them for a fullscreen mode? Showing only the most three active users? You name it. As a developer, all UI control is in your hands while the Amazon Chime SDK only cares for handling the WebRTC logic.
When a user leaves the meeting, the SDK will notify React again. React will mark that slot as free to be used by another user.
Here’s an example of how it’ll work:
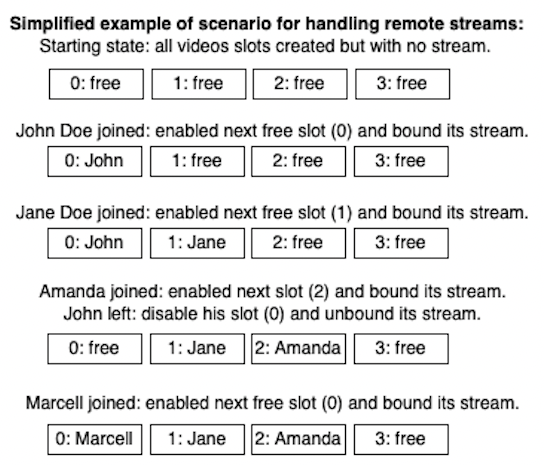
Make sure you understand this algorithm before trying to implement it more ahead.
Getting to work
If you already have the code from the previous post use your favorite code editor and open it, this is a direct sequel. We’ll keep using a single file called App.js.
We begin replacing our VideoRemoteOutput by a new component called RemoteVideosSection that will have all DOM elements for a given number of slots. It could be any number, but just for the sake of simplicity let’s keep it at 25. So we’ll have 25 slots of video boxes, and we’ll store their “ref” elements inside a single “ref” hook.
function RemoteVideosSection({ meetingSession }) {
  const videoSlotsRef = useRef(
    Array(25)
      .fill()
      .map(() => ({ tileId: null, video: null }))
  );

  return (
    <Box component="section">
      <h3>Other users</h3>
      {!enabledTiles.length && (
        <Typography component="p">No remote peers have joined yet.</Typography>
      )}
      <Box>
        {videoSlotsRef.current.map((slot, index) => (
          <PeerBox
            key={index}
            title={index}
            enabled={true}
          >
            <Video ref={(video) => (slot.video = video)} />
          </PeerBox>
        ))}
      </Box>
    </Box>
  );
}
Remember to indeed replace its usage in the App component, still passing that meetingSession prop that the previous component was already receiving.
Worth mentioning that we don’t want to condition the video elements’ existence, only their visibility, and the enabled prop of our custom PeerBox from the previous code should handle it.
That’s because React uses Virtual DOM to make its JSX syntax work. And V-DOM is just plain JavaScript data that must be reconciled with the real DOM when React decides it. On the other hand, the Amazon Chime SDK will have its own decisions of what to do with given elements at its own time. And we don’t want these two asynchronous tools concurring aggressively to the same video tags.
Imagine that between component renderings the SDK tries to pick a video element that it’s not yet real and only exists in V-DOM, we’d have to implement a retrying mechanism to fix that, or some other more complex flow. So let’s keep it simple following that lock algorithm we saw in drawings before.
Also, the wording here might be confusing, because we’re handling the same “thing” in different levels of abstractions. Let’s agree on calling “slots” the interface elements like our video tags for HTML/JSX/DOM, while “tile” is talking about state data managed by React and the Amazon Chime SDK. What we’re doing above is initializing references that will link slots to tiles.
The interface should be working fine there, without errors. Now, let’s proceed with declaring a few state hooks. Because, although we have good refs covering our UI, we’ll use it just for integration with the Amazon Chime SDK, and we’ll still want to rely on reactive state for managing visual details. Here is the state and a few utility access functions for it:
const [enabledTiles, setEnabledTiles] = useState([]);
const enableTile = (tileId) =>
  setEnabledTiles((previous) => [...previous, tileId]);
const disableTile = (tileId) =>
  setEnabledTiles((previous) => previous.filter((p) => p !== tileId));
const isEnabledTile = (tileId) => enabledTiles.includes(tileId);
And then, another hook for handling side effects, i.e., SDK integration:
useEffect(() => {
  const findSlot = (tileId) =>
    videoSlotsRef.current.find((slot) => slot.tileId === tileId) ||
    videoSlotsRef.current.find((slot) => !slot.tileId);
  const mapToAssignedSlot = (assigningTileId, assigningSlot) =>
    videoSlotsRef.current.map((slot) =>
      slot.video === assigningSlot.video
        ? { ...slot, tileId: assigningTileId }
        : slot
    );
  const mapToUnassignedSlot = (unassigningTileId) =>
    videoSlotsRef.current.map((slot) =>
      slot.tileId === unassigningTileId ? { ...slot, tileId: null } : slot
    );

  const mutateVideoSlotsRef = (updatingSlots) => {
    videoSlotsRef.current = updatingSlots;
  };

const observer = {
    videoTileDidUpdate: (tileState) => {
      // TODO: video updated
    },
    videoTileWasRemoved: (tileId) => {
      // TODO: video removed
    },
  };

  meetingSession.audioVideo.addObserver(observer);
}, [meetingSession]);
Our code is getting more complicated now, I know! Keep remembering the final goal: to let React control which slot is available or not, and how can the Amazon Chime SDK acquire/assign a slot and release/unassign a given tile to it.
That findSlot function searches the refs looking for the first useful slot, i.e., a free slot to be used by a new tile (or slot used by an updating tile). Remember that at this point all slots have an element associated with it because of our JSX loop.
In the meanwhile, mapToAssignedSlot and mapToUnassignedSlot are just basic functions to help marking if the slot will be locked or unlocked for SDK usage, that’s being done by associating or dissociating a tile to that slock. If the slot has a tileId, it’s in use and locked to that tile, otherwise it’s free.
That mutateVideoSlotsRef just commits whatever change decided by the other helper functions. And then right after it we have the typical observer boilerplate being configured for letting us know what the SDK is doing.
While there shouldn’t be any errors, nothing is happening yet. Now let’s put in use all of these functions rewriting the observer object:
const observer = {
  videoTileDidUpdate: (tileState) => {
    if (
      !tileState.boundAttendeeId ||
      tileState.localTile ||
      tileState.isContent
    ) {
      return;
    }

    const slot = findSlot(tileState.tileId);
    if (!slot) {
      throw new Error("Failed to find slot for remote peer.");
    }

    mutateVideoSlotsRef(mapToAssignedSlot(tileState.tileId, slot));

    if (tileState.active) {
      enableTile(tileState.tileId);
    }

    meetingSession.audioVideo.bindVideoElement(
      tileState.tileId,
      slot.video
    );
  },
  videoTileWasRemoved: (tileId) => {
    mutateVideoSlotsRef(mapToUnassignedSlot(tileId));
    disableTile(tileId);
  },
};
Now things are easier, we’re just using what we created before. First, on videoTileDidUpdate, we have a condition guarding ensuring that the rest of the function will only handle remote people activity. Then we find a good slot to be used according to our algorithm and assign the tile given by the SDK to the found slot. And you’ll notice that at the same time we also update the state hook for JSX reaction. This takes care of React interests over this resource.
The next step is to take care of the WebRTC logic. In this case, it’s just calling that <em>bindVideoElement</em> method providing the matching slot and tile.
And finally, on videoTileWasRemoved, the SDK is telling us that it did its mojo under the hood to finish that peer activity, so we’ll update our React logic by unassigning the given tile from that slot, making it available again.
One last detail, is that JSX must include an update:
<PeerBox
  /* … */
  enabled={isEnabledTile(slot.tileId)}
 >
Just a visual touch to hide unused slots.
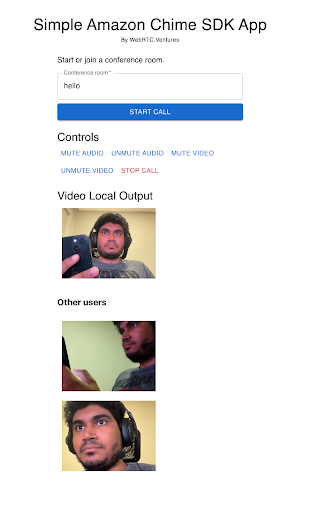
Here’s what it should look like if I try to join with 3 different devices (and/or an incognito browser window):
Final considerations
“With great power, comes great responsibility.”
The Amazon Chime SDK does not prescribe how your video front end should look. You can lay out the videos any way that you want. This is a great power, but also means you need to put a bit more work into the frontend to handle the video layouts.
This is different from most video client SDKs available out there. Other CPaaS’s will typically have you specify a div element for where the video should go on your page. From the confines of that div element, the CPaaS controls everything visually for you, adding and removing new children elements at their own will. While that is easier on you as a developer, it also means much less flexibility and less control over your UI, as well as causing problems with React reconciliation like mentioned before.
And if you need to change anything in about the video UI in other CPaaS’s, you will be limited to their library API options, or you may have to try to query the elements from the DOM to inject your own custom changes. This again risks getting in into a battle between V-DOM and DOM. For those reasons, we like the power (and responsibility) that comes with the way we can implement our own front ends for the Amazon Chime SDK.
One nice touch, in case you had the advanced curiosity, is that if you open chrome://webrtc-internals/ to debug the connections being made, you’ll see the Amazon Chime SDK optimizing the number of connections. Instead of the typical SFU approach creating N or 2*N connections for each of N users, the SDK is actually only using 1 connection to receive N user streams. And all by default, you don’t have to worry about this logic.
As for next steps, cool features to be added are maybe having one big video feed focusing on the person with the most active voice in the call, like a lot of video apps do. Since you have full control over the UI, your imagination is the limit for any styling choice you’d like. I’m a big fan of dark themes, so the demo repository has it implemented.
Are you looking for expert design and development help with building your live video application? Our team of experts at WebRTC.ventures have years of experience with Amazon and close relationships with the Amazon Chime SDK team. We would be happy to help you build, deploy, and scale your live video application. We can even offer managed services and hosting around your Amazon Chime SDK application so that you can offload everything about it to our team. Contact us today for more information!
Other posts in this series: