Users today expect seamless, omnichannel communication across their devices. This is the promise of Unified Communications. UC allows a user to switch not only from computer to tablet to mobile within a single session, but also from one mode of communication (voice, video, messaging, etc.) to another. Live video, our speciality here at WebRTC.ventures, is an important component of the UC suite. But it is just one tool in a large toolbox. As we build WebRTC applications, we also consider where telephony-based tools like SMS messaging and Voice would further enhance UX to offer a true omnichannel experience.
Vonage is a major Communication Platform As a Service (CPaaS) provider which offers an array of communications libraries including Video, SMS, Voice, Chat and more. As you can imagine, integrating all of these experiences is no small task. Vonage’s AI Studio meets this challenge. It offers a very compelling way to combine these services into a single workflow that also includes Voice Recognition, as well as the ability to integrate custom API calls of your own.
Vonage AI Studio + SimplyDoc Telehealth
To demonstrate this functionality, we have built a simple integration of the Vonage AI Studio with our SimplyDoc Telehealth Application Starter Kit. SimplyDoc was born out of our experience developing custom telehealth applications. The idea of this codebase, which is built on top of the Vonage APIs, is that the majority of the telehealth clients that came to us needed a similar base level of functionality:
- Video telehealth visits
- Phone integration as a backup
- Text chat
- Screen sharing
- Secure file transfer
We license the SimplyDoc code to telehealth entrepreneurs to get their applications to market faster than a custom app. Generally speaking, this usually ends up being an “80% solution.” The remaining 20% is what makes that client’s telehealth application unique in the marketplace. Perhaps they add in a special type of image processing, integration with other apps, or a custom workflow. Whatever it is, that is their special sauce as a healthcare provider and we can build that for them around the SimplyDoc codebase.
In this blog post, we’ll show you how the Vonage AI Studio allows a patient to reschedule their telehealth visit via a phone call. This simple example could be extended to include other communications channels such as SMS messaging, text chat with a chatbot, or even WhatsApp messaging.
The Experiment
Scheduling an appointment is a vital component of the telehealth process. Telehealth visits can be scheduled online by the patient in SimplyDoc’s base functionality. If they want to later change the appointment? No problem! Our standard configuration allows this to be done via the website.
For the sake of experimentation, we wanted to see how the Vonage AI Studio would allow the rescheduling via a phone call with a bot instead. Ricardo, a member of our WebRTC.ventures development team, recorded a complete demo of how the integration works and the configuration process. In the rest of this blog post, I will walk you through the key parts. You can also watch the full video of the “Vonage AI Studio Walkthrough” here.
Reschedule Flow
In the Vonage AI Studio, you start out by setting up an Agent, which is the phone number and/or chatbot that you are working with. Each agent can have multiple workflows associated with it. In our sample, SimplyDoc Agent we will be working with a flow that we have named “Reschedule Flow.” As the name indicates, this flow is for when a patient calls into a phone number to reschedule their appointment. The workflow dashboard looks similar to the following:
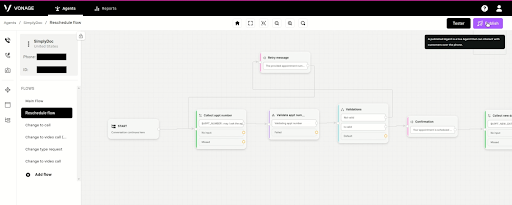
When the patient calls the phone number associated with the Agent, they are first directed to the Main Flow. This is not pictured above, but you can see in Ricardo’s video that it creates a set of action items for the patient to choose. When the patient says something like “I want to reschedule my appointment,” they are redirected to the Reschedule Flow shown above.
Note that in our demo video and in this blog post, I’m referring to all the patient actions as if they are done over a phone call. However, one of the nice things about the Vonage AI Studio is that the same workflow can also be used with chatbots who are interacting with the patient over SMS messaging, WhatsApp messages, or a text chat in a browser. With one workflow, you can set up multiple channels for your users to communicate with you, depending on their personal preferences or the device they are using at that time. All the complexity is handled for you by the AI Studio!
Testing and Publishing
To take your application live, you Publish it in the Vonage AI Studio. That’s what will tie it to your real phone number for the Agent. While you’re developing and testing your flows, it works a little differently. In Test Mode, you can enter your own personal phone number. The AI Studio will call out to you instead of you dialing into a production phone number. This allows developers to test their workflows from their personal phones, as Ricardo shows in this portion of the video.

Alternatively, you can do your testing via text chat with a bot directly in the AI Studio. This will work the same way as on your phone as well as simulating what this flow would look like if implemented over any of the text-based channels like SMS, WhatsApp, or your own custom text bot on your website.
Integrating Vonage AI Studio With Your Custom App
The next part of Ricardo’s video shows how you integrate the AI Studio with your own custom applications. In order to reschedule a patient’s appointment, we need to identify their original appointment in our database. There are a number of ways you might implement this in a real application. Perhaps you ask the patient to enter their birthdate, type in their name, or you try to identify the patient based on the phone number they are calling from. For the purposes of keeping our demo simple, we assume the patient knows a unique identifier for their appointment. This Appointment ID has been supplied to them in the email confirmation for their appointment.
In this next portion of the video, you can listen as Ricardo receives a test call from the AI Studio, and the bot voice asks him for his Appointment ID. After that, Ricardo then tells the bot the new date and time that he wants to schedule the appointment.
When a patient supplies a piece of data such as the Appointment ID, Ricardo must configure the workflow to supply that data to our custom application. The Collect blocks will gather that information from the user and pass them as a Parameter to subsequent blocks in Ricardo’s workflow. Then he can put in data blocks that validate that the information supplied by the user is of the correct type (a number or a date for example). Finally, he configures a WebHook block to send that Parameter’s data to our custom APIs in SimplyDoc. Using that WebHook, our SimplyDoc code can receive and validate that Appointment ID, as well as change the appointment to the new date in our database.
In this example, our API then returns a boolean indicating Success or Failure of the date change. The bot can then notify the patient and conclude the call.
When the system doesn’t quite understand Ricardo’s reading of his Appointment ID, you can see that it can ask him to type it in using the keys on his phone. This will generate DTMF tones, just like a typical call center application.
The second and longer part of Ricardo’s video does a complete walkthrough of the workflow and how he configures everything. I’ll point to two particularly interesting aspects here.
Configuring WebHooks
First, if you want to see how the WebHooks are configured, start at around minute 23:00 in the video. As Ricardo discusses and as shown in the screenshot below, you will enter a URL to your API and supply the parameters given by the user as part of that URL. Then you can define the returned data from the API and assign them to variables so that they can be used later in the workflow.

Voice Recognition
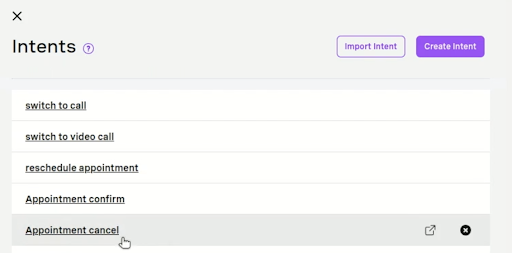
Second, it’s also interesting to see how the voice recognition aspect of the AI Studio works. Whenever our patient is going to talk to the bot, that is called an Intention. The Intention indicates the “intent” of why the patient is speaking to the bot. For example, in the screenshot below, the patient is answering the first question of the phone call, where the bot asks the patient what they want to do. Our bot has been configured to allow multiple intents, such as switching their telehealth visit from a video call to a phone call.
Rescheduling the telehealth visit is one of those intents, and the one we’ve been focusing on in this blog post. So, we need to “train” the bot to understand what our patient might say when they want to reschedule an appointment. Ricardo has configured that in the screenshot below by entering in typical phrases that a patient might say, such as “I need to reschedule my appointment.” The Vonage AI studio converts the patient’s speech to text. This allows the AI to intelligently match that text to one of the Intents that has been configured.
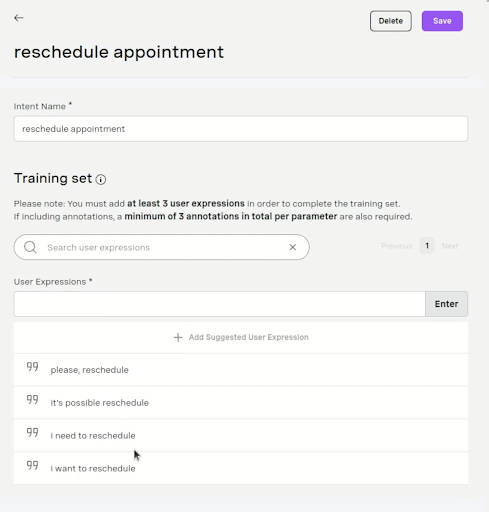
The more phrases Ricardo puts into the training set for this Intent, the more accurately we can capture what the patient wants to do. To see more on the Intents, skip to around minute 13:00 of the video.
Other Applications
In this blog post and in Ricardo’s more detailed video, we have given you a taste of how powerful the Vonage AI Studio can be. We integrated a simple rescheduling workflow into our custom telehealth application and in the process opened up a completely new channel of communication with our application! All with relatively few coding changes.
We’ve kept this example simple intentionally. There’s actually a lot more we could do with it. For example, since we know who the patient is and their phone number, we could use Vonage to text them confirmation of the appointment change. This integration with SMS messaging could be built into the same workflow for rescheduling our appointment, so no code would need to be built directly in our SimplyDoc application.
We could also add in other typical call center flows like transferring to a human if the user presses “Zero”. This action could cause the AI Studio to exit the standard workflow at any point and initiate a call to the receptionist at our doctor’s office.
Not Just for Telehealth: Call Centers and More
Although we’ve focused on a telehealth application here, the same concepts can be applied to any application. You can configure just about anything you would expect a typical call center application to do and tie it into your custom application with the AI Studio.
This opens up a lot of possibilities for customer contact centers to improve the service they provide to their customers, and to automate many of the functions that a customer needs.
When you come to WebRTC.ventures and ask us to build a live video application, one of the first questions we will ask is if you want to use one of the CPaaS solutions like Vonage. A major benefit of using a CPaaS is the ability to leverage the enterprise capabilities already built into that CPaaS. This speeds your time to market and reduces the cost of building your application. The Vonage AI Studio is a powerful tool to consider if you would like to add omnichannel and Unified Communications capabilities into your live video application.
Are you looking to build a custom video application and integrate it with telephony and call center functionality? Leverage our expertise in the Vonage APIs, and contact our team today!