SimpleWebRTC is a popular JavaScript library for building WebRTC applications. It is usually used in conjunction with its signaling server, Signalmaster, to provide an easy way for developers to add video conferencing capabilities to a web application.
There are other tools that resemble the SimpleWebRTC approach. Essentially, these libraries work by abstracting some of the tasks that, when using the WebRTC APIs directly, have to be performed manually by the developer, and deal with the differences between browser implementations.
The usual workflow is add to the library to the client JavaScript file and creates a library-defined object, which connects with a signaling server in order to initiate communication. The object is in charge of handling the access to local media devices, streams and DOM objects.
Usually the developer must set up the signaling server either by implementing another utility from the same library vendor or by provisioning a compatible server.
In this article we will review three libraries that provide you a comparable experience and we will build some small examples using them. You will need NodeJS to run them, so download it here if you don’t already have it.
Download the code from the github repository and open it using your favorite code editor. Each example lives in its own folder and the file structure is as follows:
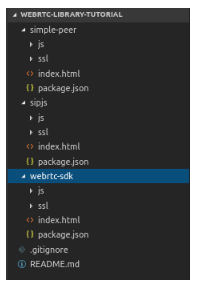
Each example has its own js folder, which is where the webrtc library and the custom app javascript files reside. They also contain a pair of SSL keys used by the http-server node package, defined in the package.json file, to serve the files. The keys are self-signed so you’ll need to add an exception in your browser in order to access the application.
Finally an index.html contains the main page of the application.
In order to run the examples, go to the desired folder using a terminal emulator and run the following commands:
npm install
npm start
Using SIP.js for your video conference app
SIP.js is a JavaScript library that uses the SIP protocol for signaling. It is compatible with popular open source implementations like Asterisk and FreeSWITCH, and also offers its own server alternative: onSip, that provides seamless integration.
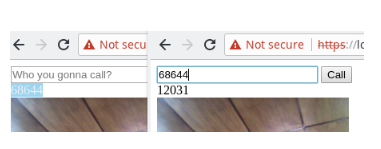
To get started, run the example and go to https://localhost:8080 in your browser, type a login name and wait for the application to log you in. Then you will see a message like “logged in as bobXXXXXXXX”, copy the login name and repeat the process in another browser tab, then paste the first user name in the “Who you gonna call?” box and click “Call” to initiate the call.
Take a look at the image below. On the left, user Bob is logged in and Lucy, on the right, has typed Bob’s user and is ready to initiate a call.

What’s going on under the hood? First, let’s examine the index.html file. We have defined two main divs, one for the login and call controls, and another one for the actual call. The relevant code is shown below.
| <div id=”login”>
<input type=”text” id=”uri” placeholder=”Your name”/> <button id=”btnLogin”>Sign In</button> <span id=”showUser” style=’display:none’></span> <input type=”text” id=”callee” placeholder=”Who you gonna call?” style=’display:none’/> <button id=”btnCall” style=’display:none’>Call</button> <button id=”btnHangup” style=’display:none’>Hangup</button> </div> <div id=”call”> <video id=”localVideo” autoplay></video> <video id=”remoteVideo” autoplay></video> </div> |
To login, we create a SIP.JS object and define a configuration object. By default the library tries to connect to a sandboxed server powered by OnSip. When using it in production you must provide your own servers and pass a wsServers parameter to the ua object.
The login code is shown below.
| var configuration = {
media: { local: { video: localVideo }, remote: { video: remoteVideo, audio: remoteVideo } }, ua: { traceSip: true, uri: localUser, displayName: inputUri.value, } } var simple = new SIP.WebRTC.Simple(configuration) |
Next, to manage calls, after the user has successfully logged in, we define some events for when a call is received, ended or initiated, as follows:
| simple.on(‘registered’, () => { //user has logged in
/* … some DOM related code … */ simple.on(‘ringing’, () => { //receiving a call simple.answer() //answer the call /* … some DOM related code … */ }) simple.on(‘ended’, () => { //the call has ended /* … some DOM related code … */ })
btnCall.addEventListener(‘click’, (btn,evt) => { simple.call(inputCallee.value) //initiate a call /* … some DOM related code … */ })
btnHangup.addEventListener(‘click’, (btn,evt) => { simple.hangup() //ends a call /* … some DOM related code … */ }) }) |
Using WebRTC-SDK to build your video chat application
WebRTC-SDK is a JavaScript library that uses the Pubnub service for signaling, which means a Pubnub account is required. You can get a free account here.
Once you have your pubnub account, go to js/app.js and paste your publish and subscribe keys on the phone initialization as follows:
| var phone = PHONE({
number: number, publish_key: ‘your keys here’, subscribe_key: ‘your keys here’, media: { audio: true, video: true }, ssl: true }) |
Now run the example and go to https://localhost:8080 in your browser. You are automatically logged in with a random phone number assigned to you. Open the application in another tab and copy the phone number, then paste it in the other tab and click “Call” to initiate the call.
What happened? Let’s look at the index.html where we have defined two main divs: one for the call controls and the other one for the video elements. Note that initially there are no video tags; we will add them later through javascript code.
| <div id=”login”>
<input type=”text” id=”callee” placeholder=”Who you gonna call?”/> <button id=”btnCall”>Call</button> <button id=”btnHangup” style=’display:none’>Hangup</button> </div> <div id=”call”> <div id=”my-number”>Loading…</div> </div> |
When you added the pubnub keys, you get a glimpse of how to define the Phone object. Let’s look at it more deeply and take a look at the phone events. The relevant code is shown below.
| var phone = PHONE({
number: number, //a random number we generate publish_key: ‘your pubnub keys here’, subscribe_key: ‘your pubnub keys here’, media: { // the media constraints audio: true, video: true }, ssl: true }) phone.ready(function () { console.log(‘Phone is ready’) }) phone.camera.ready(function (video) { //when the local video is ready console.log(‘Camera is ready’) //we add it to the page phone.$(‘call’).append(video) //using append }) phone.receive(function (session) { //here we receive the call session.connected(function (session) { //once connected we add … /* … some DOM related code and … */ phone.$(‘call’).appendChild(session.video) //… the remote video }) session.ended(session => { //when the call is ended in remote side session.hangup() //we also hangup on local phone.$(‘call’).removeChild(session.video) //and remove the video /* … some DOM related code … */ }) }) btnCall.addEventListener(‘click’, (btn, evt) => { var callee = inputCallee.value console.log(‘calling ‘ + callee) session = phone.dial(callee) //we initiate the call /* … some DOM related code … */ }) btnHangup.addEventListener(‘click’, (btn,evt) => { phone.hangup() //we end the call /* … some DOM related code … */ }) |
Using simple-peer to build your video conferencing application
Simple-peer is a concise node.js style API for WebRTC. It supports building from simple chat applications to video conferencing.
Unlike the other two libraries shown before, this doesn’t require a specific type of signaling server, you are free to implement it as you like. In this example we are using Pubnub, so you’re gonna need to add your keys in the js/app.js file.
| const pubnub = new PubNub({
publishKey: ‘your keys here’, subscribeKey: ‘your keys here’ }) |
Now run the example and go to https://localhost:8080 in your browser using two tabs. Type a different login name in each one and click “Log in”. When you’re ready to initiate a call, type the other user name and click “Call”.

To see what is happening let’s take a look at the main files of this example: index.html and js/app.js.
In the index.html file, same as the two examples before, we have defined two main divs: one for the login controls and the other one for the call itself.
| <div id=”login”>
<input type=”text” id=”caller” placeholder=”What is your name?”/> <button id=”btnLogin”>Log in</button> <span id=”showUser” style=”display:none”></span> <input type=”text” id=”callee” placeholder=”Who you gonna Call?” style=”display:none”/> <button id=”btnCall” style=”display:none”>Join</button> <button id=”btnHangup” style=’display:none’>Hangup</button> </div> <div id=”call”> <video id=”localVideo” autoplay></video> <video id=”remoteVideo” autoplay></video> </div> |
As we are using pubnub for signaling, we must subscribe to a channel and set listeners for when a message comes through. In this example we are giving each user its own channel for receiving messages. We do this as follows:
| var p //the simple-peer object. We will get back to this in a minute
//we create a pubnub object const pubnub = new PubNub({ publishKey: ‘your keys here’, subscribeKey: ‘your keys here’ }) //event buttons btnLogin.addEventListener(‘click’, (evt, btn) => { showUser.innerText = ‘logged in as ‘ + inputCaller.value pubnub.subscribe({ channels: [inputCaller.value] //the user subscribes to its own channel }) pubnub.addListener({ message: message => { //when a message is received.. console.log(‘received’, message) if (!p) { //… create a peer if doesn’t exist… createPeer(false, message.message.caller, () => { console.log(‘answering ‘, message.message.caller) p.signal(message.message.data) //… and process the message }) } else { p.signal(message.message.data)//… or just process the message } } }) /* … some DOM related code … */ }) btnCall.addEventListener(‘click’, (evt, btn) => { //initiate a call createPeer(true, inputCallee.value, () => { console.log(‘calling ‘, inputCallee) }) }) btnHangup.addEventListener(‘click’, (evt, btn) => {//end a call /* … some DOM related code … */ p.destroy(); p = null; localVideo.src = ”; remoteVideo.src = ”; }) |
You may be wondering about the p object and the createPeer function. The simple-peer library creates peers that communicate to each other through signals.
After a peer is created it will generate a message that needs to be sent to the other peers through the signaling channel, so that it can be processed using the signal function. The peers keep communicating in this way until the call is established.
The code for the createPeer function is shown below:
| function createPeer(isInitiator, otherPeer, callback) {
navigator.mediaDevices.getUserMedia({ // we get access to media devices audio: false, video: true }).then(stream => { /* … some DOM related code … */ //we set the resulted stream to local video localVideo.src = window.URL.createObjectURL(stream) p = new SimplePeer({ // we create the peer initiator: isInitiator, stream: stream, trickle: false //let’s keep tricke ICE ice turned off by now }) p.on(‘signal’, data => { //when a message is ready to be sent… console.log(‘sending:’, JSON.stringify(data)) pubnub.publish({ //… we send it through pubnub channel: otherPeer, message: { caller: inputCaller.value, data: JSON.stringify(data) } }) }) p.on(‘stream’, function (stream) { // got remote video stream, now let’s show it in a video tag remoteVideo.src = window.URL.createObjectURL(stream) }) p.on(‘close’, () => { //call is ended /* … some DOM related code … */ p = null; localVideo.src = ”; remoteVideo.src = ”; }) callback() }) } |
Conclusion
WebRTC libraries like SimpleWebRTC, sip.js, WebRTC-SDK, and simple-peer, help developers easily add video conferencing capabilities to web applications without dealing with the APIs directly by providing high-level utilities that integrates with different signaling alternatives.
Contact us to build or improve your WebRTC video conferencing app!
Do you want to build a video conferencing app? Do you need more information on how to have WebRTC work in your web application? Maybe you need a second set of expert eyes to take a look at one of your applications and provide a “health check” web assessment? We have an experienced team ready and happy to help you out. Contact us today!