In this post, we’re going to demonstrate how to build a simple peer-to-peer WebRTC Android client from scratch. We’ll cover how to implement the signaling backend using TypeScript and Node and the Android client without using any 3rd party service or abstraction over the WebRTC library.
The toy application we’ll build is a very simple clone of Chat Roulette, which allows users to communicate with random people over the internet.
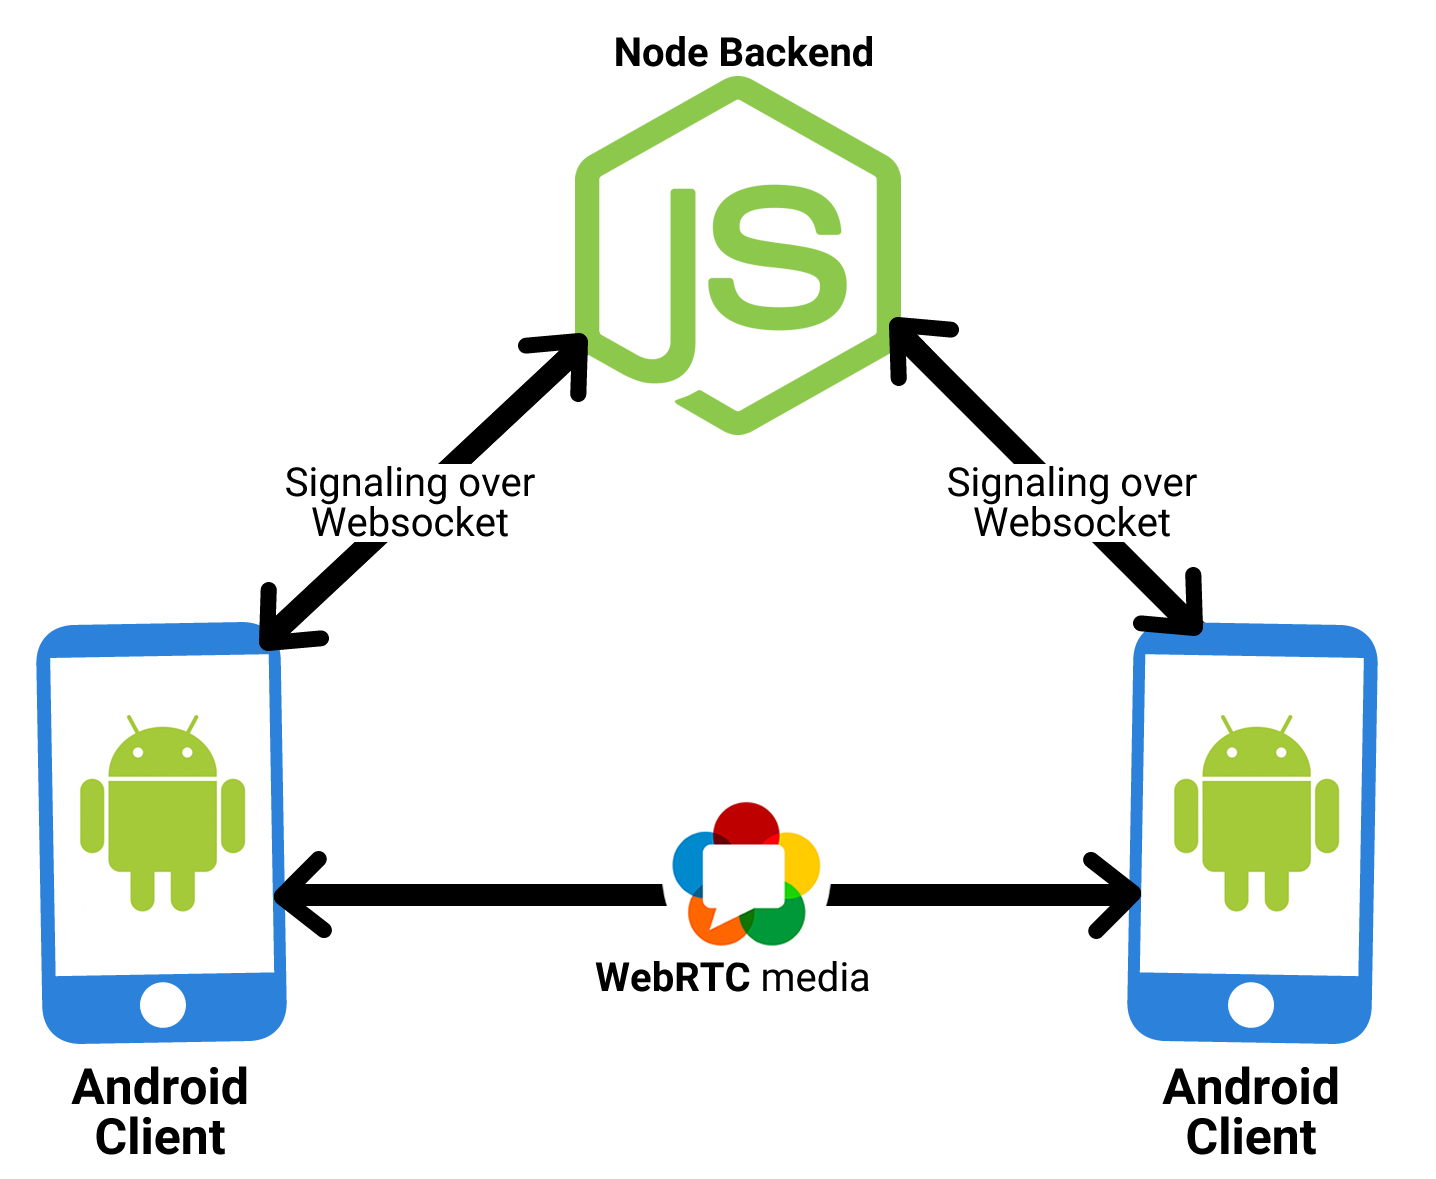
The application will be pretty simple in concept. It will allow two users to connect and establish a WebRTC videocall. The backend matches users with each other and routes signaling messages between them once a match has been made.
So, without further ado, let’s get started.
DroidRoulette Backend
We’re going to use TypeScript on the backend, so we can take advantage of its rich type system compile time type checking.
We need to install the TypeScript compiler, nodemon for watching files, and ts-node for running TypeScript code without worrying of the compilation step:
yarn add -D typescript nodemon ts-node
After that’s finished, we can start thinking of how to implement our WebSocket server. For simplicity, we’re going to use the “ws” package and the “uuid” package for generating arbitrary ids for our users:
yarn add ws uuid
When we use TypeScript, it’s necessary to install type definitions for JavaScript libraries:
yarn add -D @types/ws @types/uuid
Then we’ll add a “script” entry on our package.json file, so we can run our development server easier:
"scripts": {
  "start": "nodemon --watch src --exec ts-node src/index.ts"
},
We’ll cover only the most important parts of the code on this blog post, but you can find the full source code here.
Now let’s setup a simple WebSocket server:
You’ll notice the structure is rather simple, since most of the logic lives in our Roulette class. Now, let’s take a look at that:
We’ll use a Map to keep track of connected users and a Set to know which users haven’t been matched yet, this is not advised in a production environment, but it will suffice for demonstration purposes.
One of the most useful aspects of using TypeScript is being able to model the domain as accurate as possible, let’s take the message exchanged with the client as an example:
The ClientMessage type is known as a “Union Type”, commonly found in functional languages, such as OcaML and Haskell. This will allow us to check at compile time, which kind of message it actually is, based on the `type` property.
DroidRoulette Client
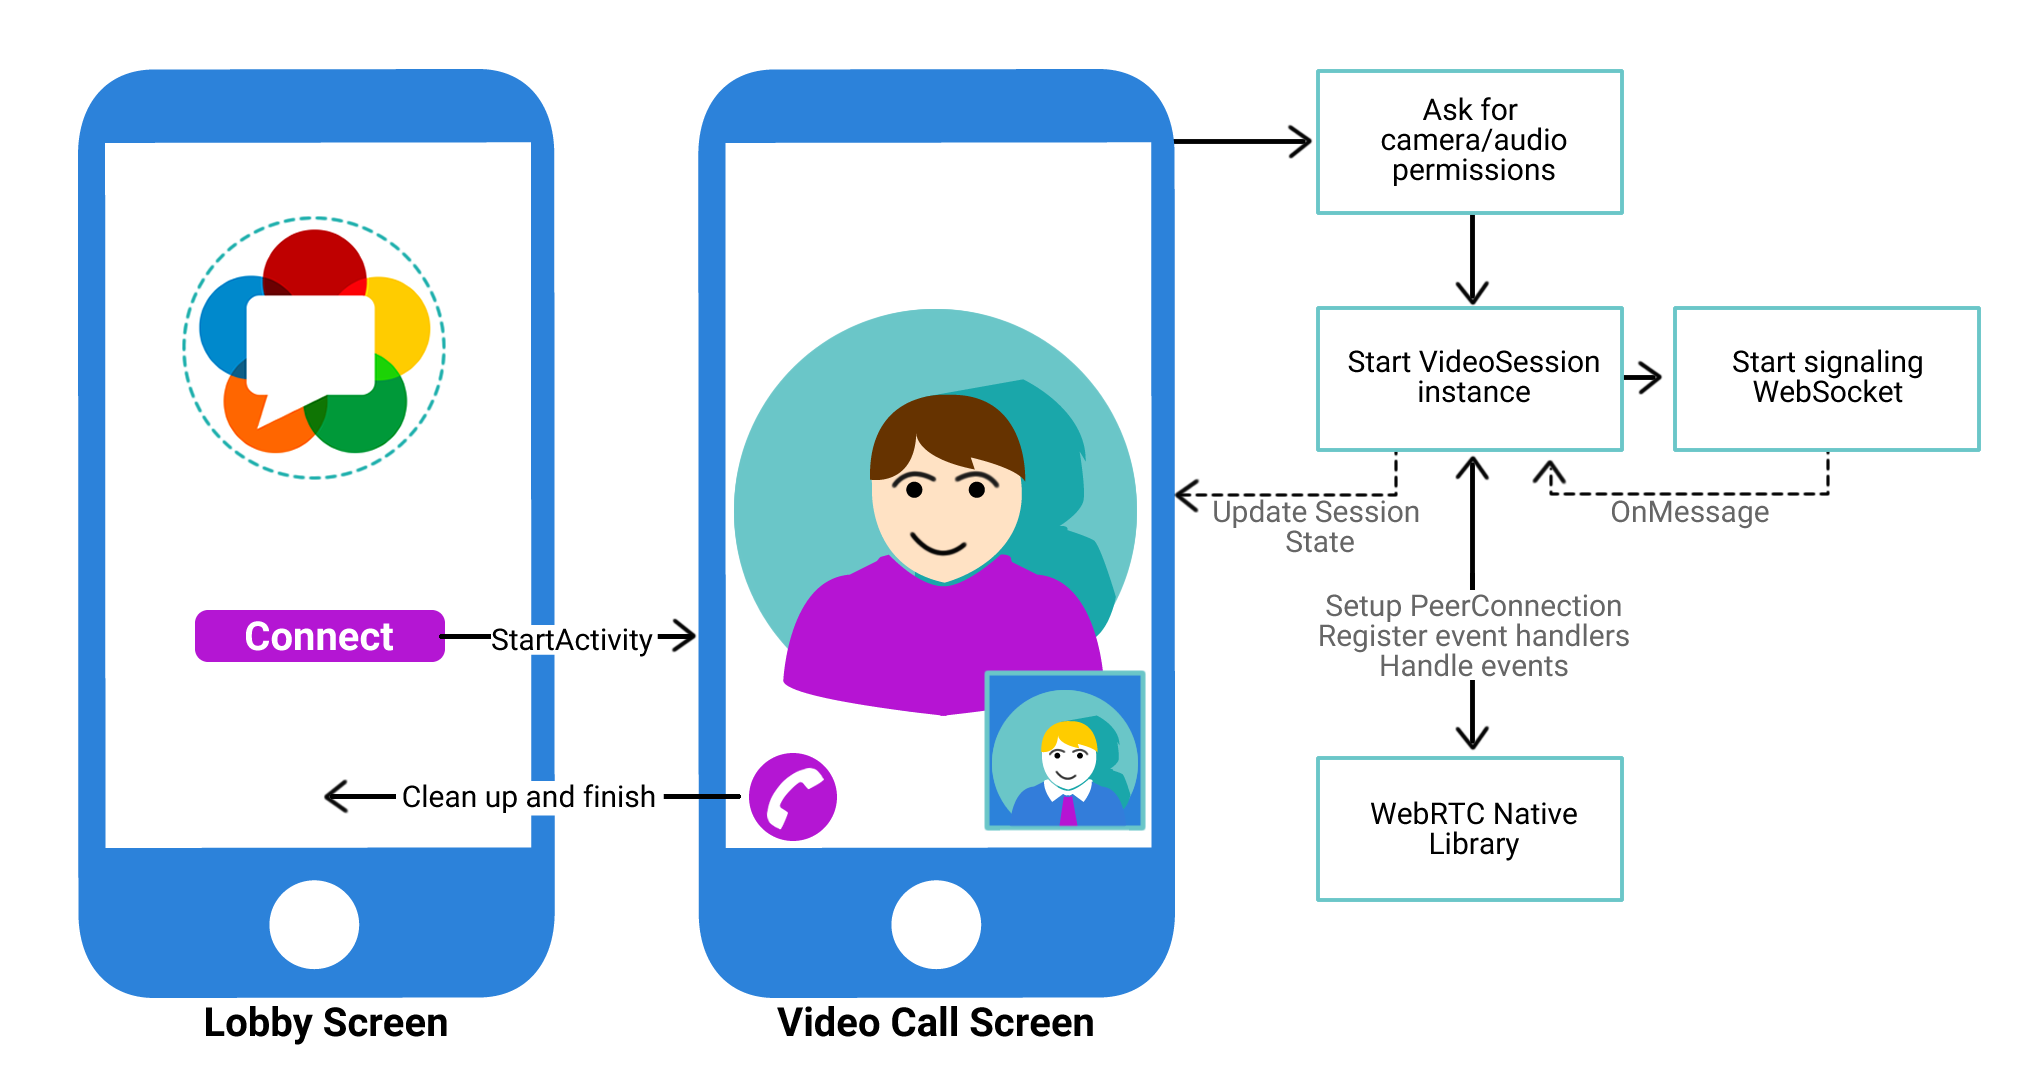
The client code and architecture is a bit more complicated than the server’s, so we’ll illustrate it with a diagram:
As we mentioned above, we’ll develop the client application in Kotlin, a relatively new language that’s officially supported for Android development.
For better results, we recommend using Android Studio 3.0+ and Kotlin 2.1+.
Before we jump into the code, we’ll need to install a few dependencies to our new Android application, we can do so by adding
compile 'org.webrtc:google-webrtc:1.0.19742'
compile 'com.squareup.okhttp3:okhttp:3.6.0'
to our dependencies section, in our module’s build.gradle.
Then we’ll need to declare that we’ll need access to the camera, permission to record audio and Internet access. In our AndroidManifest.xml file, we add:
<uses-permission android:name="android.permission.INTERNET" />
<uses-permission android:name="android.permission.CAMERA" />
<uses-permission android:name="android.permission.RECORD_AUDIO" />
<uses-permission android:name="android.permission.ACCESS_NETWORK_STATE" />
Directly on the <manifest> section, then we can jump into the code.
Our main activity is a pretty simple one. It has one button that invokes the video call activity once it’s pressed. We’ll skip that part but you can see its source code here.
Then, on the onCreate method of the VideoCallActivity, we’ll need to get a reference to our views:
The first two things that differ from Java are the lack on implicit casts on the findViewById calls, and the simplicity of the setOnClickListener call.
Then we declare a onStatusChanged method, that will be invoked when the session’s status cahnges, so we can notify the user:
We need to run any code that affects the UI on runUIThread, once again, the code is pretty simple as there’s no need for an anonymous class, like in Java.
Then there’s the VideoCallSession class, this class is in charge of spawning the signaling WebSocket and do de WebRTC “plumbing”. Something that’s worth mentioning about this class, is that code that uses WebRTC objects such as PeerConnection, MediaStream and so on, needs to be executed on the thread where the PeerConnectionFactory was originally created (it shouldn’t be the UI’s thread), that’s why SingleThreadExecutor is created, the field is static so that multiple calls are executed on the same thread. This is how we would do that on Kotlin:
This class’ code is asynchronous and event oriented, which makes following it difficult, the diagram below describes the flow of interactions between 2 clients and the backend. A blue arrow means that the message was sent over the signaling websocket, while a green arrow means peer to peer, most likely over UDP, traffic.
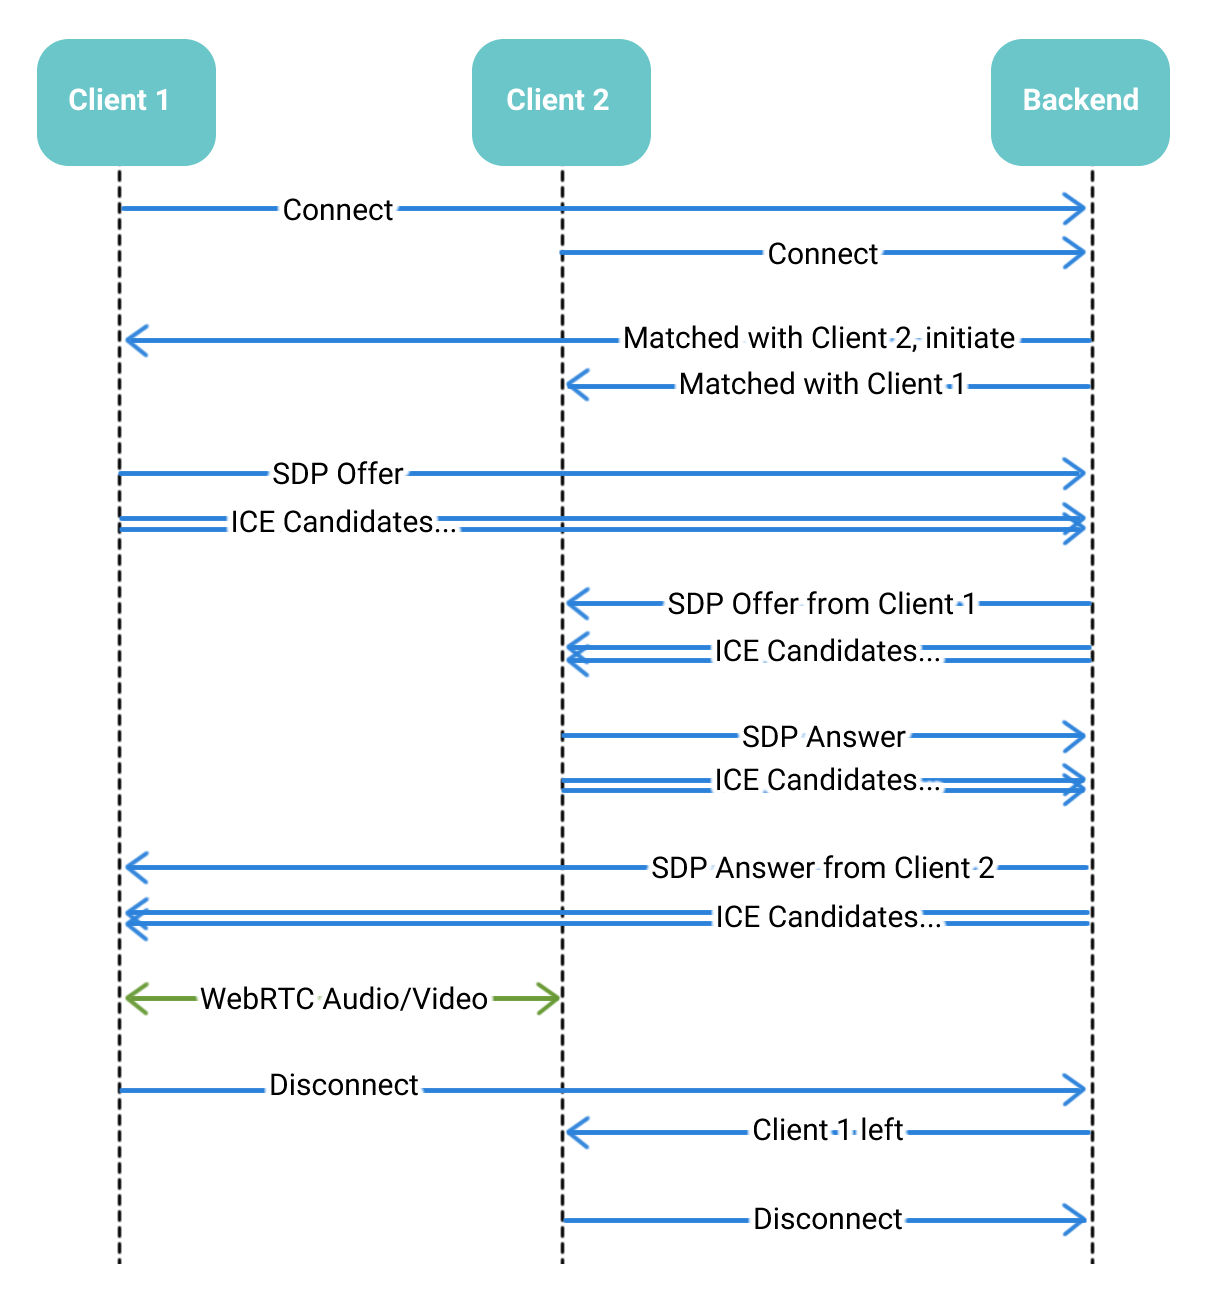
These are the most important events and where they can be found in the code:
- Connected: This is triggered automatically by connecting to the backend.
- SDP Offer: This is generated on the maybeCreateOffer method, this only happens if the backend indicates that this client should initiate communication.
- ICE Candidates: The candidates are sent on the handleLocalIceCandidate method, they’re sent to the backend as soon as they’re gathered.
- SDP Answer: The answer is generated in the handleRemoteDescriptor method, only if the peer is not the one who initiated.
- WebRTC Media: This is handled in the application via MediaStream objects on the addRemoteStream method.
- Disconnect: This is triggered automatically when the client disconnects from the backend.
And just like that, we have a native WebRTC application that gives full flexibility and works across SDK 16 to 26, that’s 100% of devices supported!
We hope you found this tutorial both easy to understand and helpful.
Want to leave it to the webRTC experts?
Should you need help in either assessing what you have built, maybe an expert 2nd set of eyes, or maybe even building your application idea for you, let us know. We would be happy the help you out.